
It’s not new, it’s not without competitors, so why use Jekyll.
A few years ago I was working in an Internet of Things startup. I was creating Technical Documentation for the company’s software and hardware and started using Markdown for the process. It was quick to pick up and made writing or rather styling a breeze. What’s more I had slick process for building and publishing our online documentation using Jekyll.
So what is Jekyll?
It’s a static site generator. That’s a site with no database and no server side code, every post and page exists on your server as an HTML document and it’s not going to change unless you rebuild the site. Out of the box Jekyll is very little. It’s basically a parsing engine, which is going to take the content you create in HTML or Markdown, apply rules you add with Liquid (templating language used in Jekyll) and output a full static site structure.
## Static sites - my blog is not static Well it’s pretty static, and with add-on for forms, comments etc, for each new post you add, you rebuild and redeploy your entire site!
## Setting up and getting started I ran through the Step by step tutorial in Jekyll docs, this doesn’t take long and gives you a load of ‘ah - I get it’ moments. Sadly I’m a Windows user, so the command line is not where I’m most comfortable, but more and more these days I seem to be moving away from UI tools and using CLI to build my projects whether its WordPress with Yarn & WebPack, or now Jekyll. Jekyll is written in Ruby, so first off you’ll need to install Ruby - this was trouble free which was a pleasant surprise. With Ruby onboard you can install Jekyll and in a couple of steps, create your Hello World page, create your site and view it in the browser. The rest of the tutorial will introduce you to the templating language Liquid, creating templates for your site header, menu navigation, creating pages and posts for your site. It’s a great introduction to all the functionality you are going to need to create your site.
## Choosing a theme I’ve run the tutorial, I kind of get it, and I’ve built a really basic website and run it on my browser. The thing is, that was most of the work done. So what’s next?
There are a surprising number of themes out there for Jekyll, a lot of them are based or converted from existing WordPress themes. I went over to a Jekyll theme collection and downloaded this Medium based theme. I quite liked the look of it, and I really wanted something which supported sass. Basically the downloaded theme is your new site structure, once you have unzipped it to your local development directory, you can just tweak the environment and make it yours. The structure is all there on disk and really easy to follow. Run your build command and you have a fully functional site loaded in your browser.
## Getting it out there So my next step is to publish my site to the Web. There are several hosting options out there - after all this is just a set of HTML pages and you could host it pretty much anywhere, and a tempting choice was to host it for free at GitHub. I use GitHub or GitLab for all my projects, and GitHub Pages use Jekyll. Before I took the plunge I had a look around to see what other alternatives I had, what I was really looking for was something that made deployment as simple as possible (I’m going to be deploying after each new post!) and came across Amazon Amplify - this concise article by Adrian Hall led me through the initial setup.
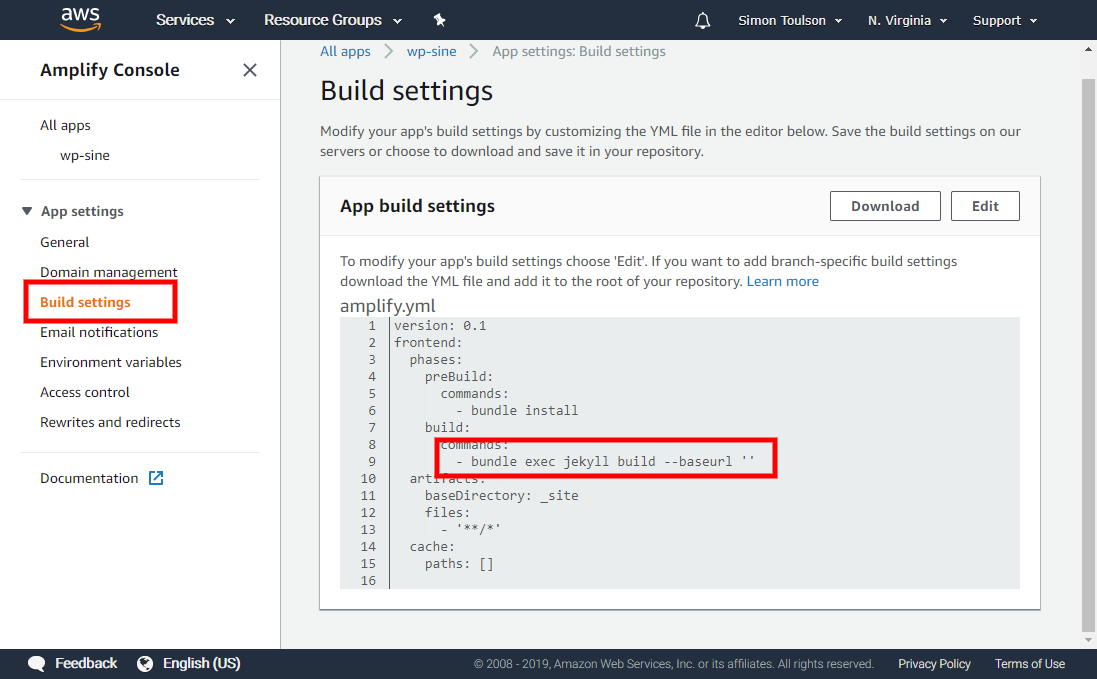
## Amazon Amplify First you are going to want to add your Jekyll project to a GitHub or GitLab repo. In amplify, I’m summarising, you connect a repo branch (in my case master) to your amplify console, and really that is it. Each time I push new content to my master branch, the site is rebuilt and redeployed with no intervention on my part. There were a few gotchas. Firstly, my local site was in a subdirectory and the ‘baseurl’ for my project pointed to this. On amplify this directory did not exist, so I needed to overwrite my baseurl on the server - amplify gives you a local build script you can edit. Adrian Hall mentions this in his Amplify article, in my case I had to clear the baseurl, and not set it to / as Adrian suggested.
My next little stumbling block, was the JEKYLL_ENV setting. Jekyll defaults this to development, and my theme uses conditionals based on this variable being set to production to include elements I don’t want to run locally, such as Google Analytics or Disqus comments. Again, Amplify has an easy fix, you can just add environment variables to your project directly from the console.
Now I have my blog deployed, albeit on a temporary domain, and to deploy changes I just push them to the repo as I would for any other project.
## Setting up a domain name for Amplify This should have been really simple. Amplify walks you through the domain setup process. You add some identifying CNAME records to your DNS, amplify will auto configure an SSL certificate for you and that’s it. Unless your domain like mine is hosted in Cloudflare. I use cloudflare DNS for nearly all my sites - but I was unable to setup the domain pointers correctly. Amplify requires an alias record, not something that Cloudflare supports directly. After a few tries I moved my DNS hosting to Route 53 - Amazon’s DNS service - this was easy to do, and the process was pretty much automatic.
## Mailchimp, disqus
## IDE I use phpstorm - plugins for MD? Link project to GitHub.
## How much does it cost? AWS is free for a year! The free plan gives me 1000 minutes of build time a month - each build is taking under 2 minutes, so I can build to my heart’s content without exhausting the limit. I can store 5Gb for free, and serve 15Gb - none of my pages are going to be above 1Mb, so with compression that’s a fair few views per day. Once my free year is up, it’s going to cost me 1 cent per build minute, 2.3 cents per Gb stored and 15cents per Gb served - at which point I might want to move my images off to a CDN. With 60 builds, 10,000 views a month and 1GB storage, you’d pay $1.38 for storage and $0.23 for GB served - Less than two dollars. Compare that to $30/month for decent WP hosting, and you are getting a fair amount for the money. (Amplify pricing)[https://aws.amazon.com/amplify/console/pricing/]